Blog · Making stickers
How to make stickers with a Cricut
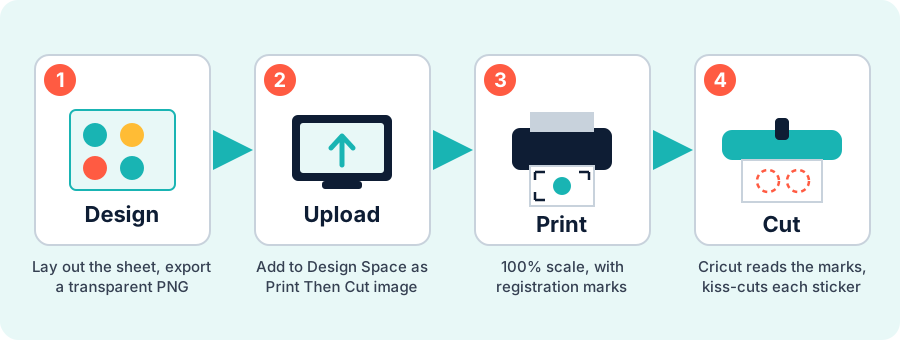
A Cricut does not print — it cuts. Making stickers with one means printing your design at home, then letting the Cricut read registration marks and cut cleanly around each sticker. That workflow is called Print Then Cut, and it is how you get professional-looking kiss-cut sheets without a print shop. Matte, non-reflective stock is the safer starting point for the sensor.
Affiliate disclosure: As an Amazon Associate, I earn from qualifying purchases.
Fast version: use a Cricut Explore 5 for the best all-around value, or a Joy Xtra for a compact setup. Add an inkjet printer and matte sticker paper, design your sheet in the free Print Then Cut tool, upload the PNG to Cricut Design Space, print at 100% scale, then cut.
What you need
Making stickers with a Cricut is really a five-part kit. You can start small and upgrade later, but every piece has a job:
- A Cricut that supports Print Then Cut — this is the one non-negotiable. Not every Cricut can do it (more below).
- A compatible inkjet printer — the Cricut cuts, your printer supplies the color. Match the printer and printable media; laser printers need media specifically rated for laser use.
- Sticker paper — matte full-sheet inkjet sticker paper is the most forgiving starting point.
- A cutting mat — a standard grip (green) mat holds the printed sheet flat while it cuts.
- Optional: laminate — clear laminate sheets add water resistance. For Print Then Cut, use a matte/non-reflective finish and test the sensor before a full run. See the waterproofing guide.
Which Cricut is best for stickers?
The single most important thing when buying a Cricut for stickers is Print Then Cut support. Without it you can only cut plain vinyl shapes, not full-color printed sticker sheets. Here is how the current lineup compares for sticker making specifically:
| Machine | Print Then Cut? | Best for |
|---|---|---|
| Cricut Joy 2 | Yes (two narrow mats) | The narrow-mat option. Design Space splits a full printable project across two mat loads. |
| Cricut Joy Xtra | Yes (Letter paper) | Beginners with limited space who want a complete Letter sheet in one mat load. See the Joy Xtra sticker tutorial. |
| Cricut Explore 5 | Yes (Letter and Legal) | The straightforward full-size choice for sticker makers. |
| Cricut Maker 4 | Yes (Letter and Legal) | Sticker makers who also cut fabric, wood, leather, and other specialty materials. |
| Cricut Maker 5 | Yes (Letter and Legal) | Sticker makers who also want the current Maker tool and material range. |
| Cricut Venture | Yes | Wide-format production work; unnecessary for a typical home inkjet sticker workflow. |
Recommendation: if stickers are your main goal, the Cricut Explore 5 is the straightforward full-size choice. Choose the Maker 4 or current Maker 5 when you also want broader specialty tools and materials. Still deciding? The full machine-by-machine breakdown is in best Cricut for making stickers.
Already have a Cricut? Skip ahead and design your sticker sheet in the free tool.
Step 1: Design the sticker sheet
Before anything cuts, you need artwork laid out as a sheet. You can design directly in Cricut Design Space, but it is fiddly for multi-sticker sheets. The faster route is to arrange the sheet first, then hand a single clean file to Design Space.
Open the free Print Then Cut tool, upload your PNGs, JPGs, or SVGs (or pick built-in icons), and set the rows, columns, and spacing. When it looks right, click Download transparent PNG. The export is up to 450 DPI with transparent gaps and a 1 mm white contour around each sticker — exactly what Design Space wants for a clean cut line. Making planner stickers? The planner sticker page is set up for that layout.
Step 2: Upload to Cricut Design Space
In Design Space, choose Upload, select your PNG, and mark it as a Print Then Cut image (complex image). Design Space traces the cut line around the white contour. This is also where you choose your cut style:
- Kiss cut — cuts only the sticker and leaves the backing, so stickers peel off a sheet. This is the classic sticker-sheet look.
- Die cut — cuts all the way through so each sticker is separate.
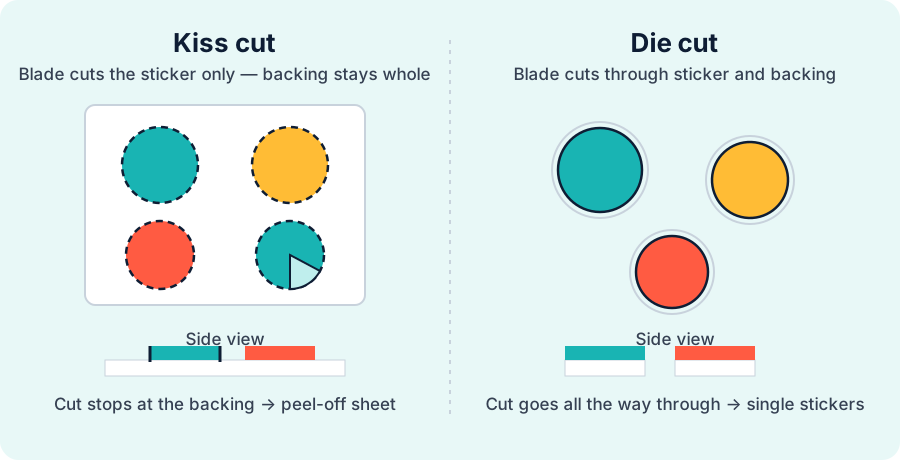
For a peel-off sheet, keep it as one image so the whole sheet prints and cuts together.
Step 3: Print with registration marks
Click Make It and Design Space sends the sheet to your printer with a border of registration marks — the black frame the Cricut sensor uses to line up the cut. Two settings matter here:
- Print at 100% scale. Do not let the printer "fit to page." Any scaling throws off every cut.
- Use the right paper setting. Match your printer's media setting to your sticker paper for crisp, dry ink.
Let the ink dry fully before cutting. For Cricut Print Then Cut, use matte/non-reflective stock and be careful with laminate: Cricut warns that glossy, metallic, glitter, and holographic finishes can interfere with the sensor marks. If you laminate before cutting, choose a matte/non-reflective finish and test one sheet first; otherwise cut with a sensor-safe surface and laminate afterward.
Step 4: Load the mat and cut
Stick the printed sheet to a standard grip mat in the top-left corner, load it into the Cricut, and select your material (sticker paper or printable vinyl). The machine's sensor scans the registration marks, then cuts around each sticker. Use good, even lighting and a matte/non-reflective surface; see Cricut's compatible-material guidance before using a glossy, metallic, glitter, or holographic finish.
Peel your sheet off the mat by bending the mat away from the stickers, not the stickers off the mat — that keeps them from curling.
Make them waterproof (optional but worth it)
Paper stickers are fine for laptops and planners, but anything that meets water — water bottles, tumblers, outdoor use — needs protection. The reliable home method is printable vinyl plus a clear laminate sheet. For Cricut Print Then Cut, use a matte/non-reflective laminate and test the sensor before cutting a batch; hand-cut or laminate after cutting if the finish interferes with the sensor. The full method, including cure time and realistic durability, is in how to waterproof stickers.
Do you even need a Cricut?
Honest answer: not to start. A Cricut mainly buys you speed and clean shapes at volume. If you are making a handful of stickers, you can print the same sheet at home and cut it with scissors, a craft knife, or a paper trimmer — and the free sticker maker can add light dashed cut guides to make hand-cutting easier. Walk through the no-machine version in how to print stickers at home. Buy the Cricut when hand-cutting becomes the bottleneck, not before.
Frequently asked questions
Which Cricut is best for making stickers?
For most people, Cricut Explore 5 is the straightforward full-size choice. Joy Xtra is the compact full-sheet option, Maker 4 and Maker 5 are for sticker makers who also want specialty materials and tools, and Joy 2 is the narrow-mat option that splits a printable project across two mats.
Do you need a printer to make stickers with a Cricut?
Yes. The Cricut cuts but does not print color. You print your design on an inkjet printer with sticker paper, then the Cricut reads registration marks and cuts around each sticker.
What is the difference between kiss cut and die cut stickers?
A kiss cut cuts only the sticker and leaves the paper backing, so stickers peel off a sheet. A die cut goes through both layers so each sticker is separate. Cricut does both by adjusting the cut settings.
Can I make stickers without a Cricut?
Yes. Print a sticker sheet at home and cut it with scissors, a craft knife, or a paper trimmer. A cutting machine mainly saves time and gives cleaner shapes at volume.
Why is my Cricut cutting in the wrong place on my stickers?
Offset cuts usually come from Print Then Cut calibration, printing at the wrong scale, or a reflective sheet confusing the sensor. Use the current Cricut calibration path, print at 100% scale, use good lighting, and choose matte/non-reflective paper.
- Cricut Explore 5 — best value for full-size sticker sheets
- Cricut Joy Xtra — compact Letter-paper Print Then Cut
- Cricut Maker 4 — stickers plus specialty materials and tools
- Cricut Maker 5 — current Maker model with 300+ materials and 13 tools
- Matte sticker paper — forgiving inkjet starter stock
- Printable vinyl — durable base for water-resistant stickers
- Clear laminate sheets — adds water resistance; use a matte finish and test the sensor
What to read next
Ready to lay out a sheet? Open the Print Then Cut tool and export your PNG. New to home printing? Start with how to print stickers at home, then pick your stock with the best sticker paper guide.