Blog · Troubleshooting
Cricut Print Then Cut not working? Fix offset and misaligned cuts
When a Cricut cuts in the wrong place on your stickers, it is almost never the machine giving up on you — it is one of four fixable things: calibration, print scale, the sensor scan, or a blurry source file. Here is how to tell which one you have and fix it in a few minutes.
Affiliate disclosure: As an Amazon Associate, I earn from qualifying purchases.
Fast version: if the cut is shifted from the art, use the current Cricut calibration path and make sure you printed at 100% / Actual Size (not "Fit to Page"). If Design Space can't read the registration marks, use bright even light and switch to matte sticker paper. If the stickers print blurry, that is a file/printer problem — export a high-resolution sheet (the free Print Then Cut tool exports up to 450 DPI) and match your printer's media setting.
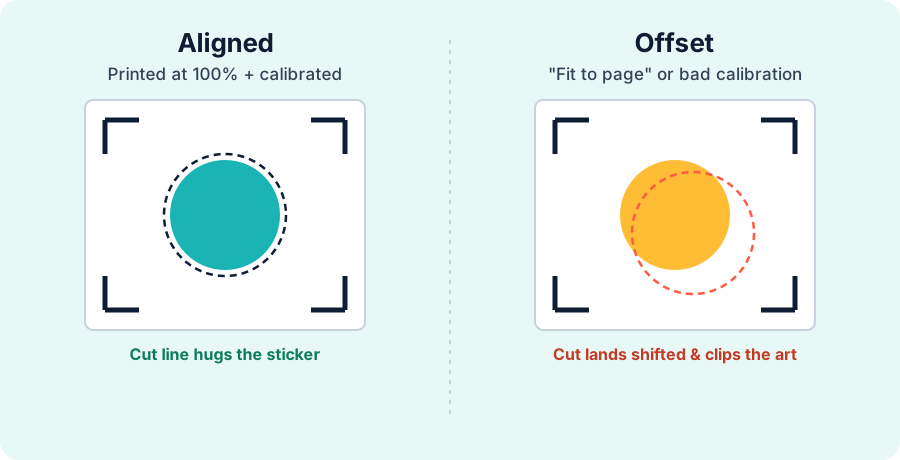
First, diagnose the symptom
"Print Then Cut not working" is really four different problems, and each has its own fix. Match what you see on the mat to the right section before you change anything:
- The cut is clean but shifted — every sticker is cut, but the outline is off to one side or slightly too big/small. That is calibration or print scale.
- The machine won't start — "can't read registration marks" — the sensor light passes over the sheet and errors out. That is a scan problem.
- The cut is perfect but the art looks fuzzy — nothing wrong with the cut at all. That is a printing/resolution problem.
- Only some stickers are off, or the sheet slipped — that is usually the mat.
Fix 1: Recalibrate Print Then Cut
Calibration is the single most common fix for offset cuts, and the step most people skip. It teaches your specific machine how your specific printer lays ink down, so the blade knows exactly where the cut line sits.
In the current desktop version of Cricut Design Space, open Settings, select Machines, choose your machine from My Machines, then under Machine Calibration select Calibrate and choose Print Then Cut. Follow the calibration sheet prompts and confirm the test cuts. Cricut says machines come calibrated; recalibrate when cuts are inaccurate or after a relevant printer or machine setup change. Paper-specific cut pressure is a separate material-setting issue. See Cricut's current calibration instructions.
Calibrated and still fighting it? Start from a known-good sheet: design one in the free Print Then Cut tool and export a clean PNG at up to 450 DPI.
Fix 2: Print at 100% scale (the "Fit to Page" trap)
This one causes more offset cuts than anything except calibration, and it is entirely in your printer dialog, not Cricut. When Design Space sends the sheet to print, your printer driver may quietly shrink it to "fit" the page. The moment it does, the registration marks move — and Cricut cuts where the marks should be, not where they printed.
In the print dialog, set scaling to Actual Size or 100%, and turn off any "Fit to Page," "Shrink to fit," or "Scale to fit media" option. Then check the printed sheet: the registration frame should sit a comfortable margin inside the paper edges, not crammed against them. If the marks are getting clipped, your paper size or borderless setting is fighting the layout.
One more scale gotcha: use Letter (8.5 × 11) paper and matching driver setting. A sheet formatted for A4 printed on Letter (or the reverse) offsets everything.
Fix 3: Help the sensor read the marks
If the machine refuses to start and tells you it can't read the registration marks, the optical sensor simply isn't seeing the black frame. It is looking for clean, dark, unbroken marks under good light. Give it all three:
- Bright, even light. Dim rooms and hard shadows are the number-one cause. Add a lamp; avoid a single harsh light that throws glare.
- Matte, non-reflective stock. Cricut says reflective materials such as glossy, metallic, glitter, and some holographic finishes can interfere with the sensor. Use matte sticker paper or another non-reflective material, and test any unfamiliar stock before a full run. See Cricut's compatible-material guidance.
- Fully printed, fully dry marks. A low-ink cartridge prints faint marks the sensor can't see, and wet ink smears into them. Let the sheet dry before loading.
- Flat and uncreased. A curled corner over a mark breaks the frame. Load the sheet flat in the top-left corner of the mat.
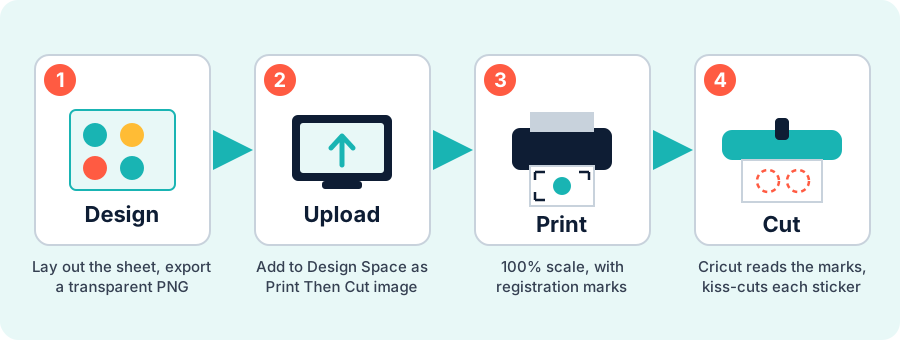
Fix 4: Blurry stickers are a printing problem, not a cutting one
If the cut lines are perfect but the artwork looks soft or pixelated, nothing is wrong with Print Then Cut — the file that went to the printer was low resolution. Two things fix this:
- Start from a high-resolution sheet. A 72 DPI screenshot blown up to sticker size will always look fuzzy. Export at print resolution instead — the MakeMyStickers Print Then Cut tool outputs a transparent PNG at up to 450 DPI, with a clean 1 mm contour Design Space can trace.
- Set the right printer media. Match your printer's paper/quality setting to your sticker stock (e.g. "matte photo" or "high quality"). The wrong media setting under-inks the page and looks washed out.
For the full home-printing walkthrough, see how to print stickers at home, and pick a forgiving stock with the best sticker paper guide.
Fix 5: Mat and loading issues
If most of the sheet cuts fine but stickers near one edge drift, or the sheet visibly shifts mid-cut, the mat is the culprit. A tired mat that has lost its grip lets the paper creep as the rollers move it back and forth. Press the sheet down firmly across the whole surface, keep it square in the top-left corner, and replace a mat once it stops holding paper. A brayer or even a credit card to burnish the sheet down removes the air bubbles that cause slipping.
A quick pre-flight checklist
Before every Print Then Cut run, five seconds of checking saves a wasted sheet: calibration is current if cuts have been inaccurate, the page is printed at 100% Actual Size, registration marks are dark and fully on the page, the material is matte/non-reflective, and the sheet is flat and square in the corner. Get those checks right and offset cuts become much less likely.
Frequently asked questions
Why is my Cricut cutting in the wrong place on my stickers?
Offset Print Then Cut comes from one of four things: the machine needs calibration for the current printer setup, the sheet printed at the wrong scale because "Fit to Page" was on, the sensor couldn't read the registration marks because of glare or reflective material, or the mat shifted. Recalibrate, print at 100%, use even light and matte/non-reflective material, and load the sheet flat in the top-left corner.
How do I calibrate Print Then Cut on a Cricut?
In current desktop Design Space, open Settings, select Machines, choose your machine, then select Machine Calibration and Calibrate. Choose Print Then Cut in the calibration modal and follow the prompts. Cricut says machines come calibrated; recalibrate when you see inaccurate cuts or after a relevant setup change.
Why does Cricut say it can't read the registration marks?
The sensor can't see the black frame. Usual causes are dim or uneven light, glare on glossy or reflective material, faint marks from low ink, smeared ink, or a creased sheet. Use bright even light, matte/non-reflective material, make sure the whole frame printed cleanly, and load the sheet flat.
Why are my Cricut Print Then Cut stickers blurry?
That is a printing problem, not a cutting one. It happens when the source image is low resolution or the printer media setting is wrong. Export the sheet at high resolution (the MakeMyStickers Print Then Cut tool exports up to 450 DPI) and set your printer media to match your sticker paper.
What is the maximum Print Then Cut size?
Print Then Cut needs room for sensor markings, so the usable area is smaller than the full sheet. On Letter paper, Cricut's current table lists 9.94 inches vertically by 7.44 inches horizontally for Joy Xtra, Explore, and Maker machines, while Joy 2 has a 3.19-inch horizontal maximum. The usable combination depends on the design proportions; see Cricut's current size table.
- Matte sticker paper — reads far more reliably than glossy under the sensor
- Cricut Explore 5 — current full-size Print Then Cut machine
- Cricut Joy Xtra — compact Letter-paper Print Then Cut machine
- Cricut Maker 4 — Print Then Cut plus specialty tools
- Clear laminate sheets — apply before cutting only when the finished surface remains sensor-readable; test first
What to read next
Getting the whole workflow straight helps: read how to make stickers with a Cricut for the end-to-end steps, decide between kiss cut vs die cut, and dial in your stock with the Cricut sticker paper settings cheat sheet. Buying a machine? Compare them in best Cricut for making stickers.