Blog · Tutorial
Cricut Joy Xtra sticker tutorial
The Cricut Joy Xtra is the compact Cricut that handles a complete Letter-size Print Then Cut project in one mat load. The smaller Joy 2 also makes printed stickers, but divides the job across two narrow mats. This is the full Joy Xtra workflow: design, print, and cut, plus the limits and settings that keep it reliable.
Affiliate disclosure: As an Amazon Associate, I earn from qualifying purchases.
Fast version: the Cricut Joy Xtra handles Letter-paper Print Then Cut in one mat load. Design a sheet in the free Print Then Cut tool, print on matte sticker paper at 100% scale, upload the PNG to Design Space, choose kiss or die cut, and let the sensor read the marks. Step up to Explore 5 for Legal-paper support, faster cuts, and more tool options.
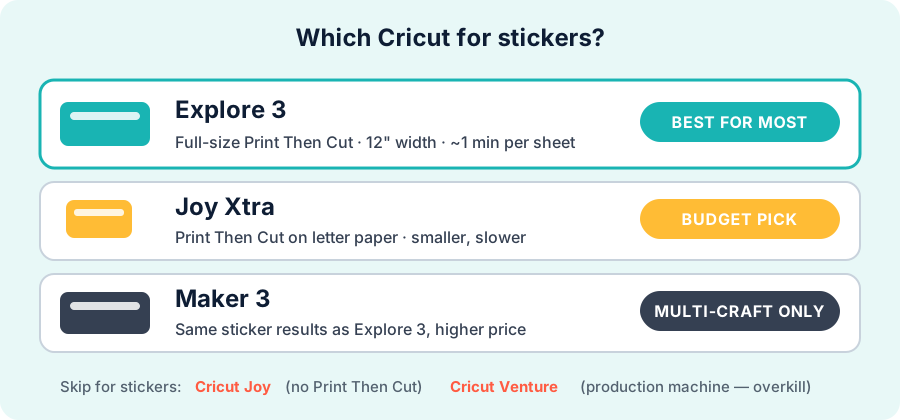
Why the Joy Xtra (and not the original Joy or Joy 2)
This trips up a lot of first-time buyers: the original Cricut Joy does not do Print Then Cut, so it can only cut plain vinyl shapes — not full-color printed stickers. The Joy Xtra added Print Then Cut and accepts a complete Letter sheet in one mat load. The newer Joy 2 also supports Print Then Cut, but Design Space splits a full printable sheet across two narrow mats. That makes Joy Xtra the smallest current Cricut for a full-sheet workflow; Joy 2 is the smaller narrow-mat option. For the full lineup, see best Cricut for making stickers.
What you need
- A Cricut Joy Xtra — the Print Then Cut-capable small machine.
- An inkjet printer — the Joy Xtra cuts; your printer supplies the color.
- Sticker paper — matte inkjet sticker paper reads most reliably.
- The Joy Xtra mat — holds the printed sheet flat for cutting.
- Optional laminate — clear laminate sheets for water resistance. For Print Then Cut, use a matte/non-reflective finish and test sensor scanning before a full run.
Step 1: Design a small sheet
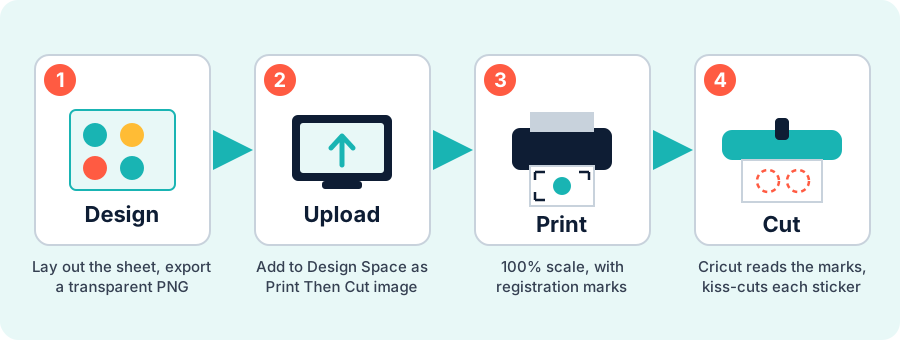
The Joy Xtra's Print Then Cut area is smaller than a full-size Cricut, so the key is to keep the sheet compact and leave room for the registration marks. Open the free Print Then Cut tool, drop in your art, and lay out a modest grid — a handful of stickers rather than a packed letter sheet. Export the transparent PNG; the tool exports up to 450 DPI, with a clean 1 mm contour that Design Space traces into a tidy cut line.
Step 2: Upload to Design Space
In Design Space (with the Joy Xtra selected), choose Upload, add your PNG, and mark it as a Print Then Cut (complex) image. Size it so the whole design sits inside the Joy Xtra's Print Then Cut boundary — Design Space warns you if it's too big. Pick your cut style here: kiss cut for a peel-off sheet or die cut for separate stickers (see kiss cut vs die cut).
Step 3: Print with registration marks
Hit Make It and Design Space prints your sheet with the black registration frame the Joy Xtra's sensor uses to line up. Two rules: print at 100% / Actual Size (never "Fit to Page"), and set your printer media to match the sticker paper. Let the ink dry fully. If you want water resistance, use matte/non-reflective stock or laminate and test one sheet before cutting a batch: Cricut warns that glossy, metallic, glitter, and holographic finishes can interfere with the sensor. Exact material and printer settings are in the sticker paper settings cheat sheet.
Step 4: Load the mat and cut
Stick the printed sheet to the Joy Xtra mat in the top-left corner, load it, and select your material (Sticker Paper or Printable Vinyl). The sensor scans the registration marks, then cuts around each sticker. Use bright, even light and matte/non-reflective material; Cricut says reflective or glossy finishes may prevent the sensor from reading the marks or may offset the cut. If a cut lands offset, use the current Cricut calibration steps or the fixes in Print Then Cut not working.
Size limits & tips
On Letter paper, Joy Xtra uses the same Design Space Print Then Cut maxima as Explore and Maker machines: up to 9.94 inches vertically or 7.44 inches horizontally, depending on the proportions of the artwork. The boundary is not a full rectangle. Joy Xtra's real constraints are that it does not support Legal-paper Print Then Cut and it is slower with fewer compatible tools and materials. Compare the trade-offs in best Cricut for making stickers.
Frequently asked questions
Can the Cricut Joy Xtra make stickers?
Yes. Unlike the original Cricut Joy, the Joy Xtra supports Print Then Cut, so it cuts full-color printed sticker sheets. You print your design on an inkjet printer, and the Joy Xtra reads the registration marks and cuts around each sticker. On Letter paper, it shares the maximum Print Then Cut dimensions of Explore and Maker machines.
What is the Print Then Cut size limit on the Joy Xtra?
On Letter paper, Design Space lists a maximum vertical dimension of 9.94 inches and a maximum horizontal dimension of 7.44 inches for Joy Xtra. The sensor-mark boundary is not a full rectangle, so the usable combination depends on the proportions of the design. Joy Xtra does not support Legal-size Print Then Cut. See Cricut’s current size limits.
Do you need a printer for the Cricut Joy Xtra?
Yes, for printed stickers. The Joy Xtra cuts but doesn't print color, so Print Then Cut stickers need an inkjet printer and sticker paper. Without a printer you can still cut plain colored vinyl shapes, but not full-color printed stickers.
Is the Joy Xtra or Explore 5 better for stickers?
They share the same maximum Print Then Cut dimensions on Letter paper. Explore 5 is faster, supports Legal paper, and works with more tools and materials. Joy Xtra is the better pick when a compact footprint and easy storage matter most.
What sticker paper works with the Joy Xtra?
Standard inkjet sticker paper works well, and matte non-reflective stock is the most forgiving for the sensor and easiest to cut. Avoid generic glossy, metallic, glitter, or holographic finishes for Print Then Cut. For water-resistant stickers, use printable vinyl with a matte/non-reflective laminate and test one sheet before a full run.
- Cricut Joy Xtra — compact Cricut for Letter-paper Print Then Cut
- Matte sticker paper — most forgiving stock for the sensor
- Printable vinyl — durable base for water-resistant stickers
- Clear laminate sheets — water resistance; use a matte finish and test the sensor before cutting
What to read next
Compare machines in best Cricut for making stickers, get the general steps in how to make stickers with a Cricut, and dial in settings with the sticker paper settings cheat sheet. No machine yet? See how to make stickers without a Cricut.